


This week in thoughts: fail to prepare, prepare to FAIL MASSIVELY.
(I repainted the bathroom. It's not that deep.)

A week or two ago, sander in hand and my motivation HIGH (thanks ADHD meds!) I decided to repaint the bathroom. The knotty, uneven finish was driving me absolutely nuts, and tbh, I’d grown to really dislike the colour. As an ADHD girlie, I am prone to dive head-first, into projects because I get SO excited. The problem with my childlike enthusiasm, is that I’ll sometimes skip steps to get to the good part, and then regret it. Forever.
So, realising the error of my ways, I grabbed my trusty little mouse sander, some 80 and 120 grit sanding pads, cleaning spray and cloth and in I went, like some crazed woman (on a mission to rid the world of bumpy surfaces.)
Paint on ill prepared (or completely and utterly *unprepared* in my case) walls just aint it. It’s not quite so bad when using a matt product because matt paint has little, to no sheen and is very forgiving, but an eggshell? OH NO. It showed up every lump, rough patch, and uneven grain going. Everytime I took a shower, brushed my teeth or used the loo the panelling would stare at me-longing for some love and attention.
To get the best result possible, I started by using a higher grit sanding pad, and used it all over the panelling, going in the direction of the grain, paying particular attention to any, very rough areas. Let’s just say it It took a while. I definitely underestimated how long this part of the process would take (that ADHD really showing up huh?) but I was also determined to get it right. Once I was satisfied with the initial sanding, I used a lower grit (120) and went over the panelling again, using the palm of my hand to examine the wood, and check it felt even and smooth.
Then it was time to clean. If you’re planning on undertaking any type of sanding work I cannot stress how much time you’ll save if you try and cover things over. I used old bed sheets to protect the suite (bath, toilet etc) and floor and felt proud of myself for commiting to this very boring task. There was still LOADS of dust, but the sheets definitely reduced the amount. I used our dyson to hoover up the majority of the dust, and then wiped over the woodwork with hot soapy water and white vinegar. I let it dry and then repeated this step. THREE TIMES. *sigh*
(It’s important to ensure the wood is super clean at this stage otherwise you risk discoloration when applying your paint. Not GOOD.)
I also noticed some pesky paint drips and got to work on those too. Again, a symptom of rushing the job before meant that paint had built up in areas, and in others I’d clearly not wiped my brush properly before applying. It’s not as though this is end of the world stuff, but if you’re detail oriented like me, and you hyper focus on imperfections, it can really affect how you view a space.
Once I was happy with the finish (I also got my very honest husband to come and inspect my work) it was time to start painting.
Here’s a reminder of how it looked before:
I loved this colour when I got the tester. My sister has it in her living room and it looks INCREDIBLE so I felt confident that it would also work in our bathroom. However, I think part of the reason it looked so lovely in my sister’s space is because she’s used a matt finish (which I personally think works better with reddish tones) and crucially, the room gets a lot of light. In my sister’s lounge, the Ganache looks very deep and very brown with just a hint of red. Whereas in our bathroom, filled with lots of artificial lights it tends to lean more burgundy and I just couldn’t get on it with it at all. It felt cold, and I think; too distant form my prefered palette of earthy tones.
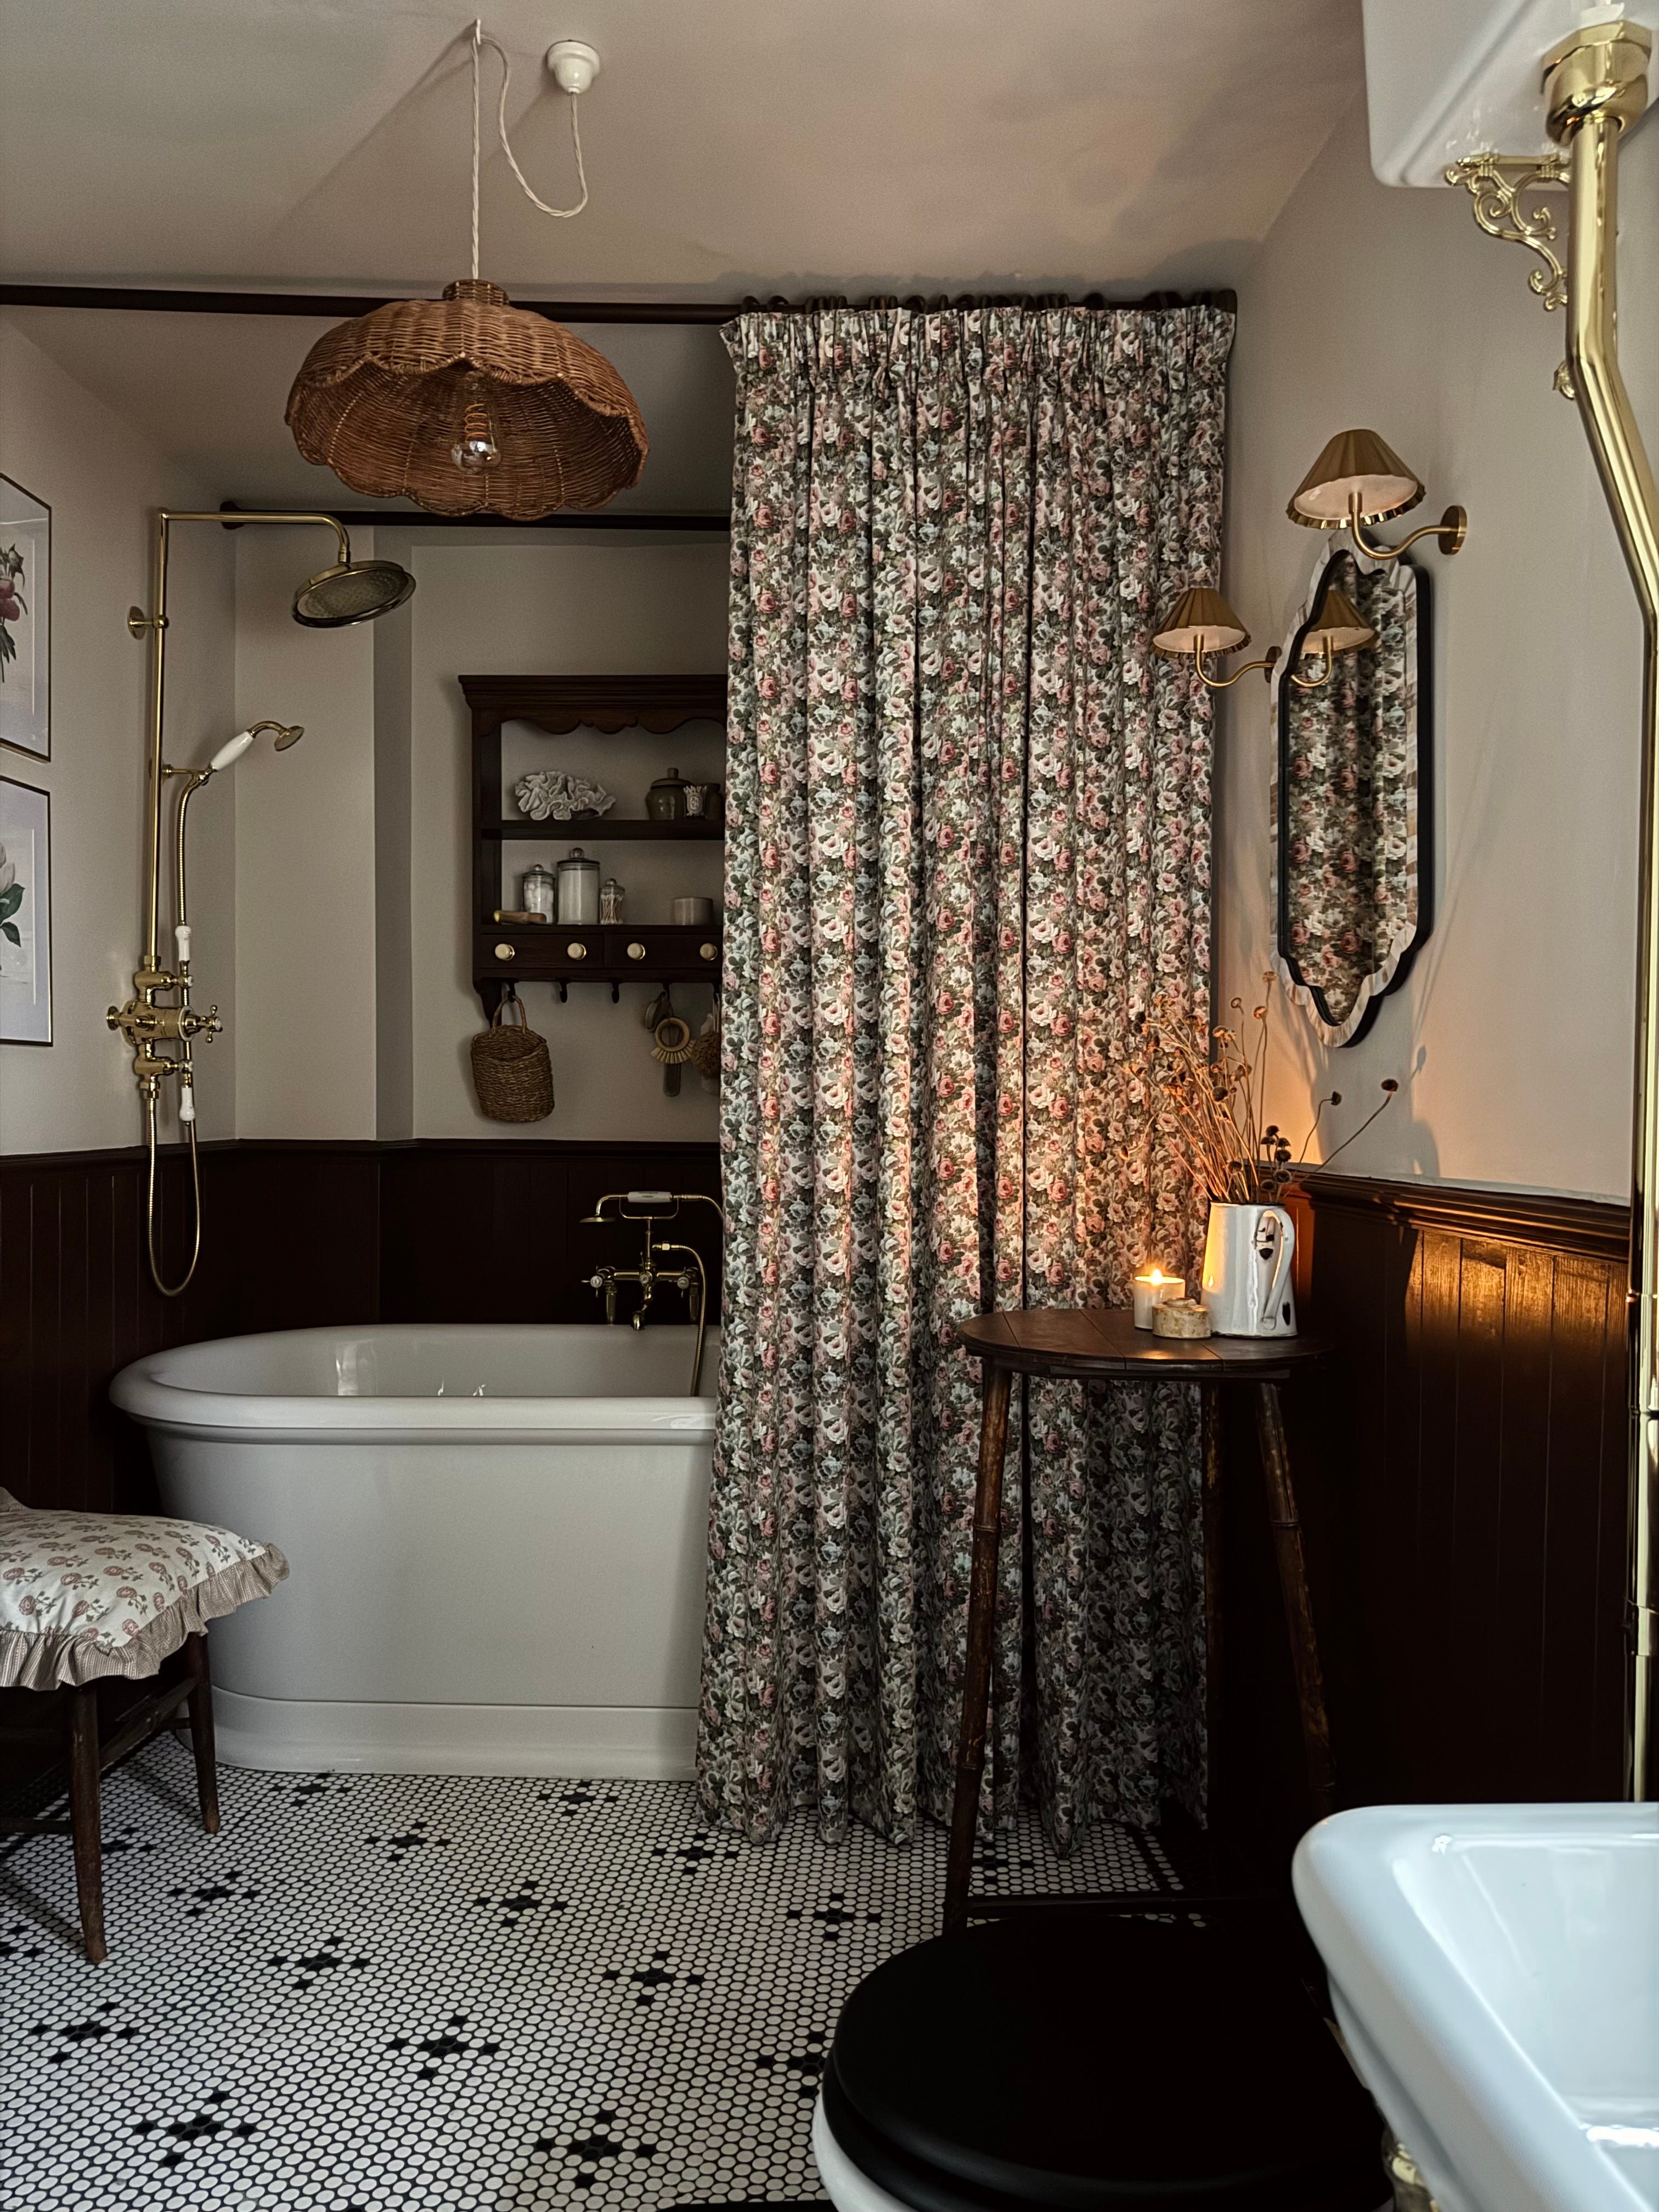
It’s a small, dark space and whilst I totally advocate for moody colours in tighter rooms, this isn’t the one. I don’t love this colour when paired with a sheeny finish but as it’s a wet room, matt was off the table. Had I used it over the freshly prepped wood I might have felt differently, but I doubt it.
Whilst finishing off the dressing room with it’s lovely green wardrobe, I realised that alongside the bedroom (which features our stunning bed; a sort of browny-greenish hue) that we also have our glorious Loaf soaf in the living room (which is in shade Wine Bottle-a delicious dark, dirty green.) It never really occurred to me that green therefore might be the link, or my common denominator. The shade to tie everything together; a pop of very subtle colour amongst the neutrals. It’s weird because I don’t feel I love green, but thinking about our old house, where we had green, I clearly do! although it has to be of the earthy variety and with sludgy undertones. Grass greens, sage greens or light, pastel greens aren’t my bag at all.
The point is, I had 2 tins of The Little Greene Paint Company Light bronze Green left (I used 3/4 of a tin to paint the thrifted wardrobe) and was determined to use it elsewhere because it is SO beautiful.
Anyway, I’m so glad I did because I absolutely bloody LOVE it in the bathroom!
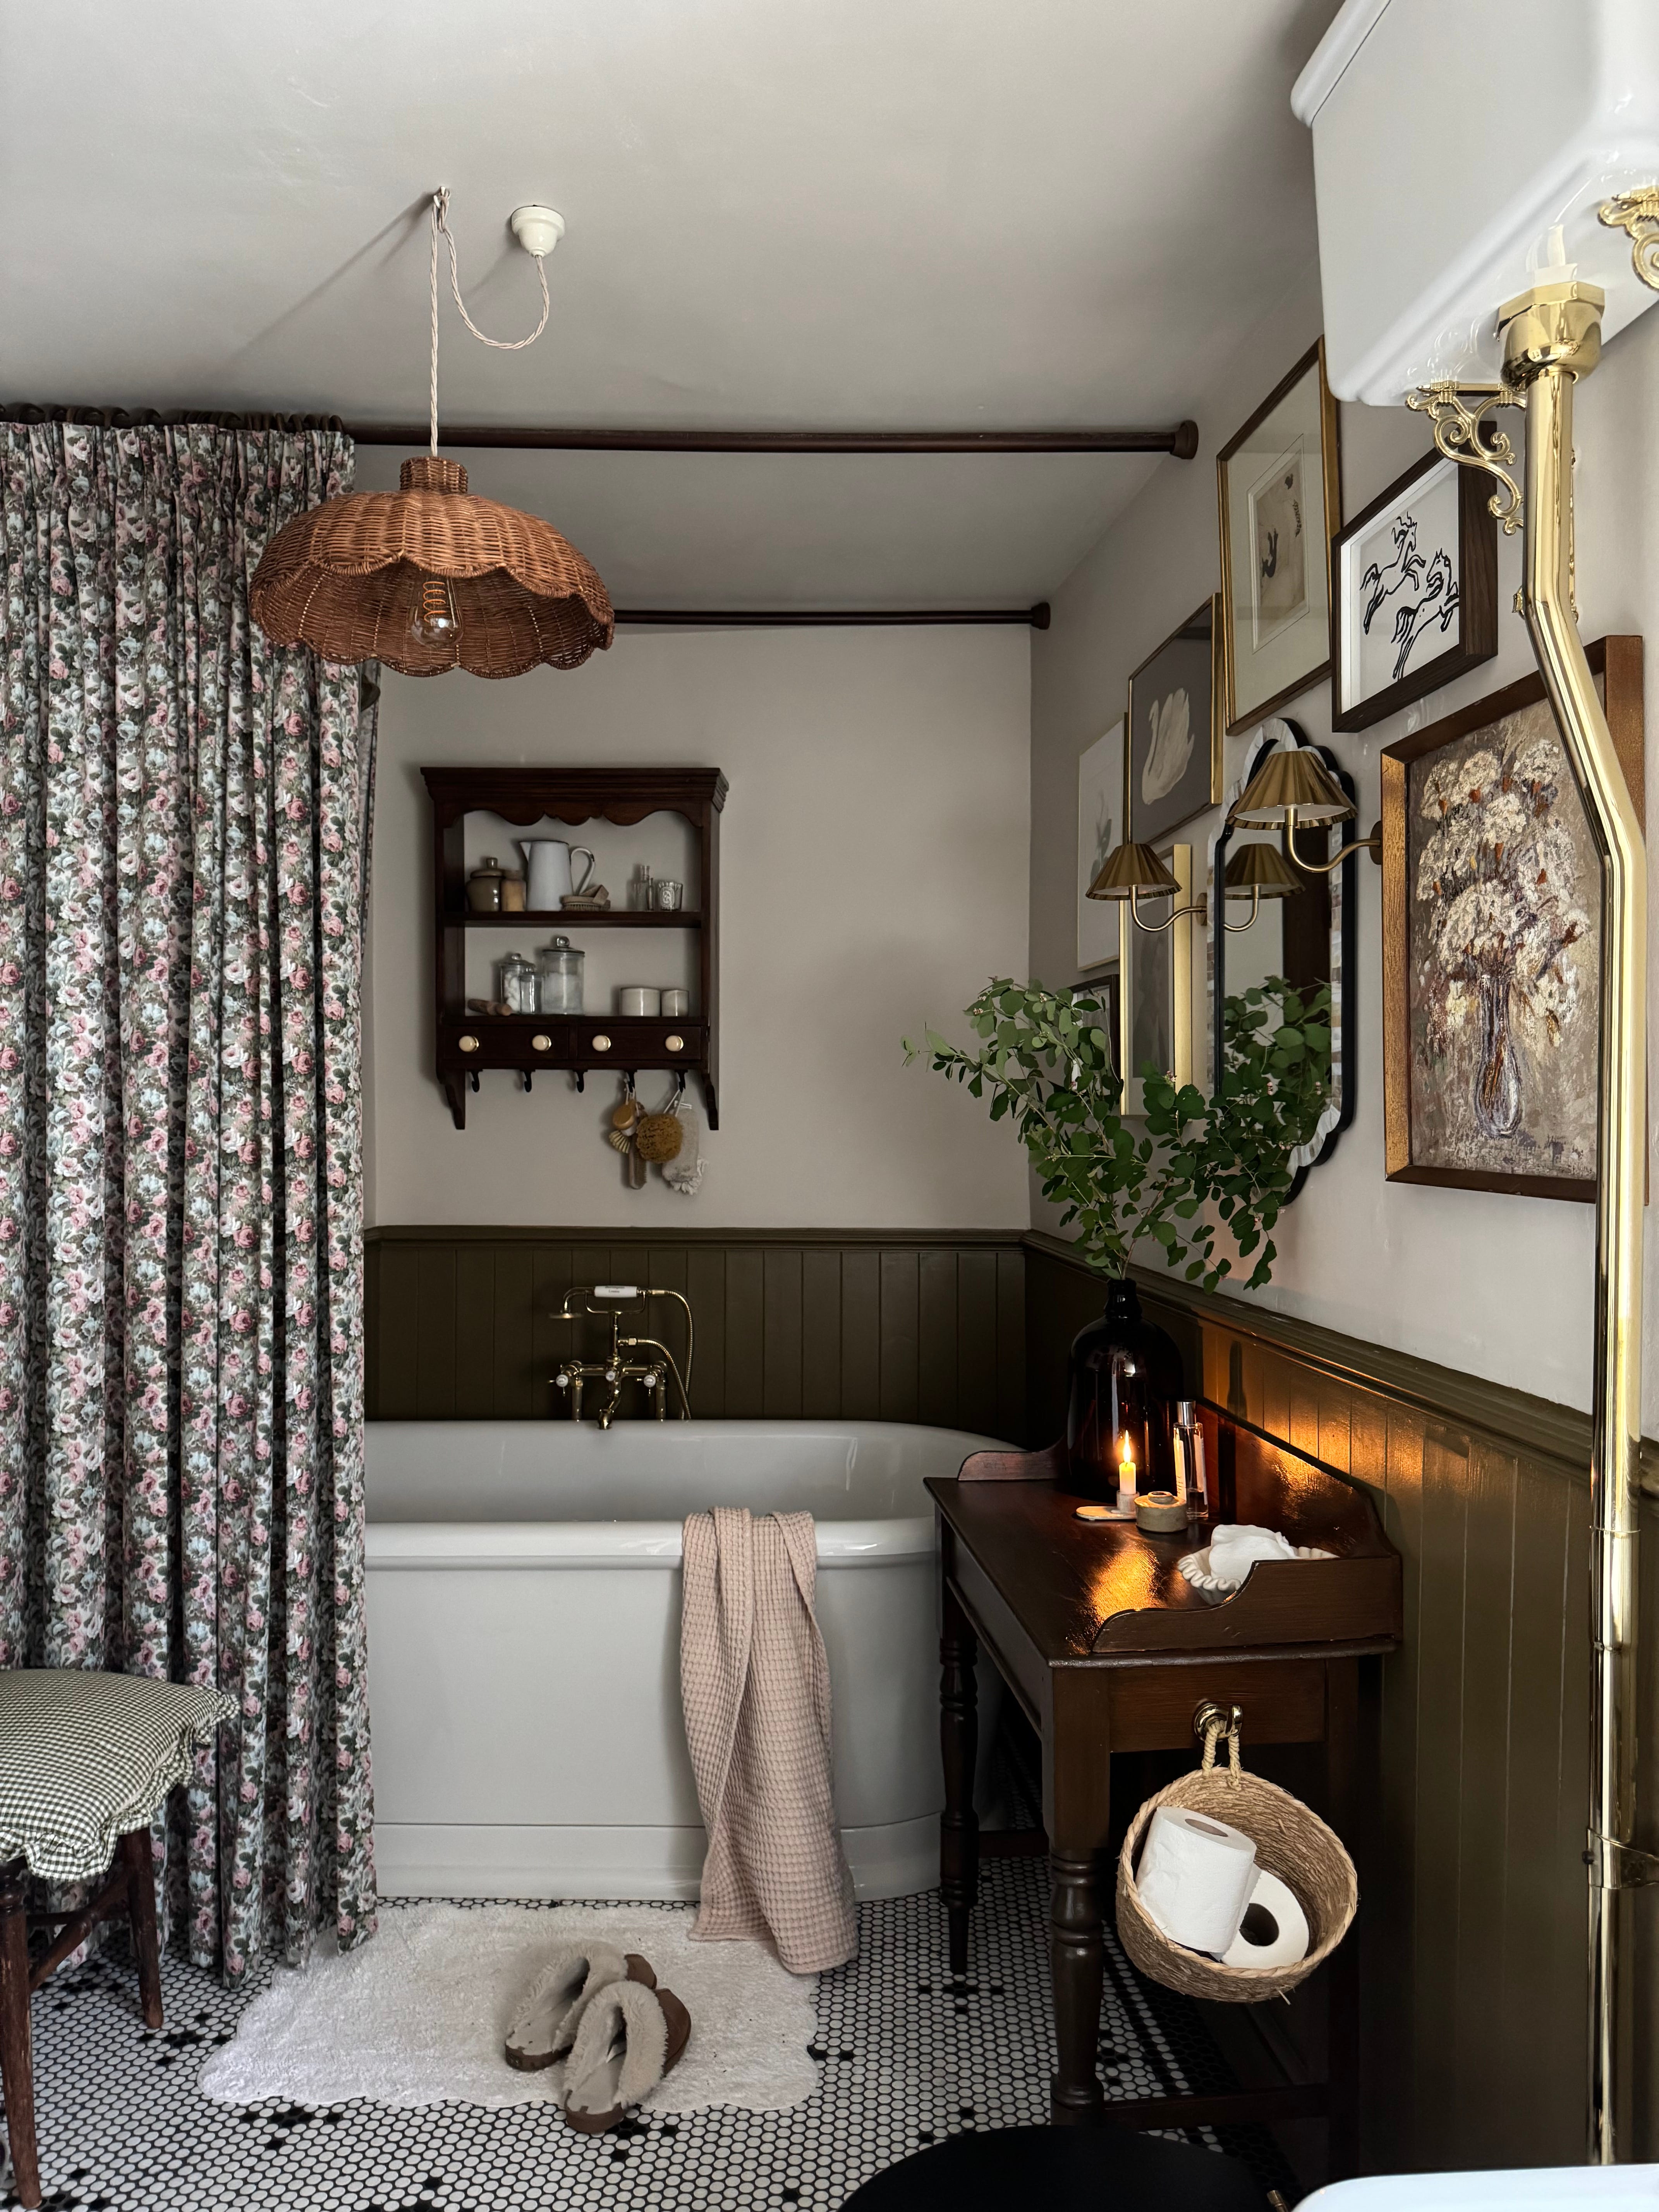
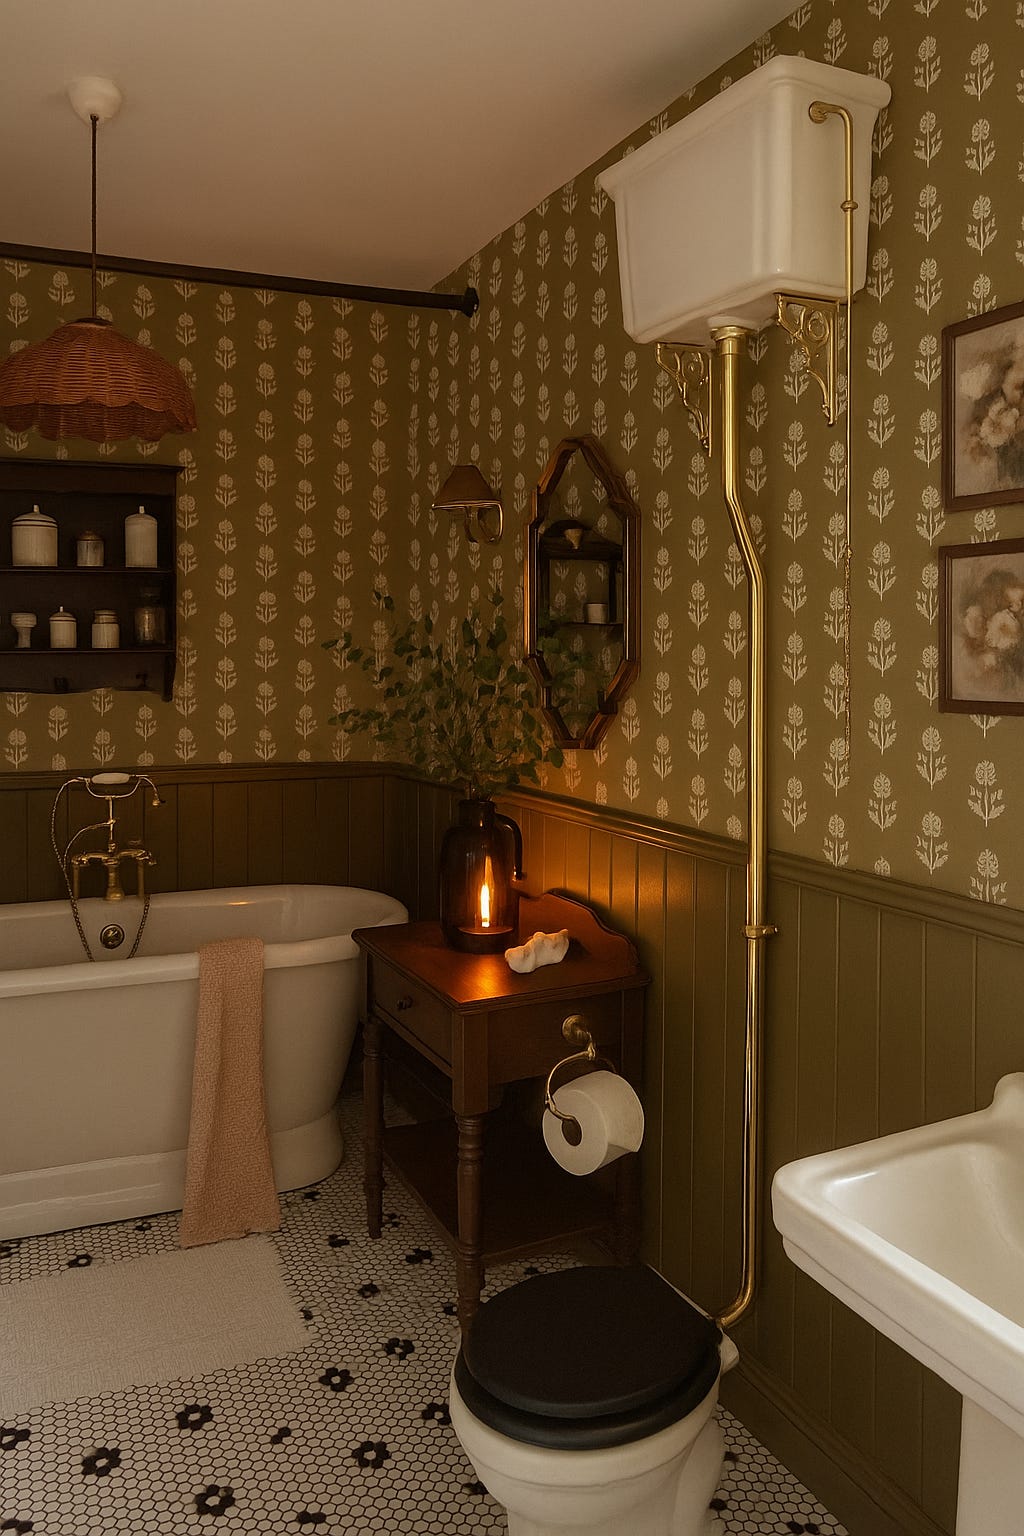
Obviously the prep has made a big difference to how the paint sits on the panelling and the finish has changed how the bathroom feels. No more lumps or bumps or knots peaking through. It’s SO smooth, and also way less sheeny. I also prefer how the green feels, especially connected to the other rooms.I am a person who loves cohesion in interiors, and definitely prefer a very limited palette of colours. Decorating these upstairs spaces has helped me to understand what I love, and what I don’t and given me a clearer vision for the hall, stairs and landing and also the rooms downstairs which I want to change.
I also swapped out the circular table for a wash stand I had in fact originally brought for the space (I’m planning on using this elsewhere) but had convinced myself it was too large and always felt a bit sad about it. It isn’t/ wasn’t too big as it turns out and so I stained it dark, and added some art above and around the mirror. I need to change up some of the frames and would like some new pieces in here but it helped me ‘map’ out the pictures and they are in place as a guide for when I install any updated prints.
I also may add in wallpaper in here in time, and asked ChatGPT to create a mock up of what a paper I have my eye on might look in the space so watch this space!
Despite being a fairly small room, repainting the bathroom has taught me a lot.
Prep is SO important (despite being very annoying)
Know what you like. Listen to your gut and observe the things you are drawn to
It’s ok to stick with what you you ‘love’
Painting even a small space takes longer than you think
The right colour paint can totally change how a room feels
It’s ok to make mistakes.
Until next week,
Nina x
It looks amazing 👏 it's